anvio
what is anvio?
anvio is a tool that transforms raw, random-looking data into clear, understandable visuals. you can think of it as a translator, not just any translator, but one that speaks many languages and presents information in a way that’s easy to see and work with.
at first, it might seem quite complicated, but it’s really just a tool, like any other tool, you can learn how to use it. you don’t need to master all its features right away. start with the basic, important ones, and if you need more advanced features in the future, you can pick them up as you go.
before installation: optimize your system and set your mindset
anvio does many things, which is why installing it requires more time than a regular program where we only need to hit next repeatedly. It’s okay, take your time and do it right. if the installation goes right, things will go much more smoothly for you later. so, get ready for an installation that is different from what you are usually used to and carefully peruse the instructions. perusing means reading in detail, not skimming. we are biologists with probably very little experience with computers. in this course, you can work on your computer skills and expand your skill set. rule number one for doing that is to read the instructions (documentation) word by word, then it’s just copy and paste.
my installation is for windows 10, 64-bit, core i5 system with no gpu, and i have 200 gb free space on my C folder. anvio is very resource-intensive, and you need to optimize your laptop before installing.
- in my opinion, core i5 is the minimum, and if your system has less cpu power, you can ask your university, in our case ASTA, to borrow a laptop for the duration of the course.
- if you have less than 50 gb free space, you can easily insert a new ssd, it’s not hard to do on your own. buy a new ssd and search online for how to install it. once done, install windows Enterprise on it because it’s much faster than the Home version (just between us, you can also find the enterprise version for free online, torrent, cough cough). i should mention that 30 gb would also do, but being so close to the system’s limit will slow your computer down and make your life harder.
make sure everything is set for the best performance. this way, you can be sure that if something goes wrong, it’s your fault and not the system’s, making it much easier to troubleshoot. when your system starts acting up, it can be frustrating to pinpoint the issue.
by the way, if you choose to install windows enterprise, connect it to your windows account for recovery if needed. sometimes, changes in your ip or network can lock you out, and without a backup, you could lose all your files.
agreement
one: you will encounter many of these oddly named software tools (like conda, miniconda, curl, etc.) that we don’t know what they exactly do. however, they are interdependent, necessary for specific tasks, and we need them. they are not our focus in this course, so we won’t spend much time on them. for now, me and you agree to be satisfied knowing they are helping us get to anvio. of course, you can always search to learn more about them later.
two: you don’t need to memorize any command or code. don’t blame yourself if you can’t remember how to do the easiest things like going from folder A to B. first google, then chatgpt or come back to the tutorials. there is no shame in not remembering the commands. do it enough time, they’ll stick.
WSL and VS Code
there is a windows-like operating system named Linux that gives you more freedom in customization and using different tools. many applications, especially in bioinformatics, are written in a way that requires linux. for this course, you can either set up a dual system by installing linux alongside your windows (takes a maximum of one hour) or install a small version of linux inside your windows (takes about 5 minutes). i recommend the latter, not only because it saves time but also for better compatibility.
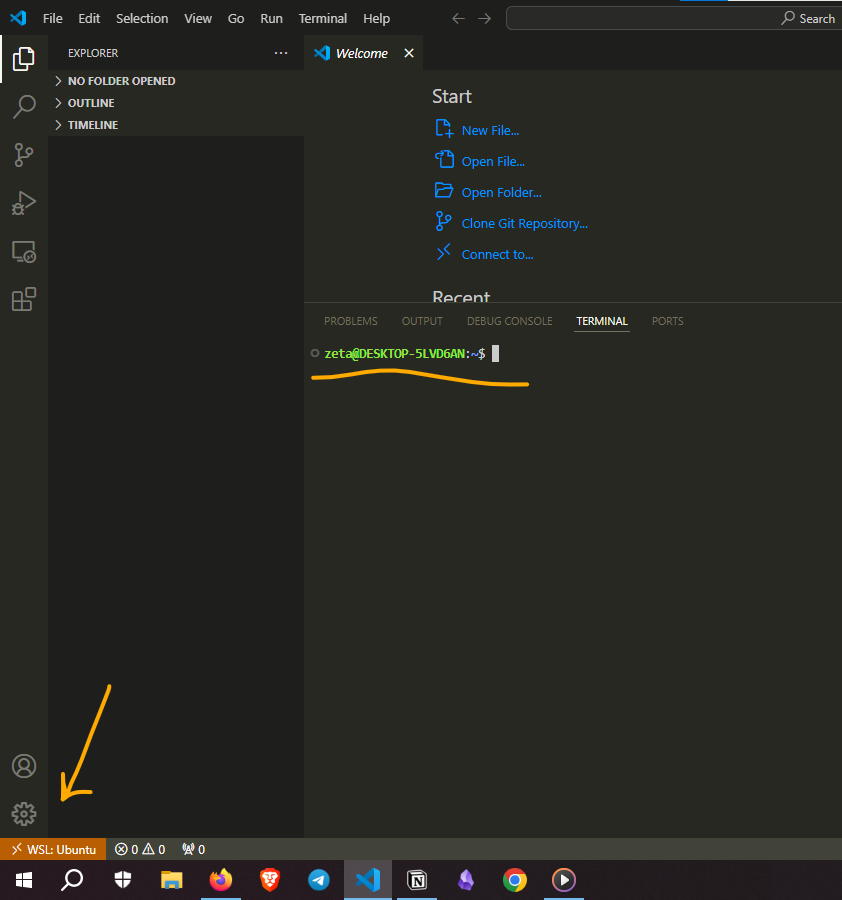
windows is designed to work seamlessly if you stick to tools specifically made for it. that’s why i installed wsl (windows subsystem for linux) and connected it to a program called VS Code, which is also built for windows. with this setup, i can access my linux terminal through vs code. you can ask chatgpt how to install wsl and how to access it remotely via vs code. once done, you’ll see something like this and can move on to the next step.
installing Anvio
we have two options for installing anvio: stable version and development version. we will choose to install the development version, not only because we are adults now :)) but also because it is actively being developed and fixed. if something during the course needs to be addressed, you will automatically have the updated version without needing to do anything actively. let’s start.
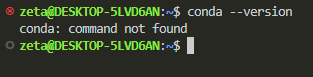
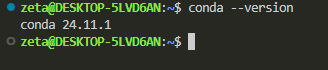
1. check to see if you have this software named miniconda.
please copy paste this in your wsl terminal inside VS Code:
conda --version

if it says command not found, you don’t have it, and you need to install it.
2. install miniconda:
from this page, you can choose your system and install it. just remember that your system’s name is now linux (not windows anymore), and we need to follow linux-specific installations. we are going to be working only with wsl during the course.
the documentation for linux says we need to download it by copying and pasting this line into the terminal:
curl -O https://repo.anaconda.com/miniconda/Miniconda3-latest-Linux-x86_64.sh

i didn’t get any errors, but you might see that you don’t have this other software named curl, and you need to install that before installing miniconda. anytime you don’t have something, just go to its original website, find the command provided for linux, and paste it.
let’s verify the download by listing:
ls
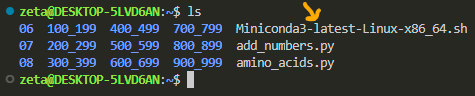
you should have a file named Miniconda3-latest-Linux-x86_64.sh, like the screenshot. (other files in my computer are irrelevant to this process.)
now we have downloaded the file, but we still don’t have the miniconda software on our system. remember that if this were a windows software, we would have clicked on a download link to get a file with a .exe extension, then double-clicked on it to run and install the software. this process is similar. we downloaded the executable file, and now we need to ask bash to run it for us because we can’t double-click on files in linux:
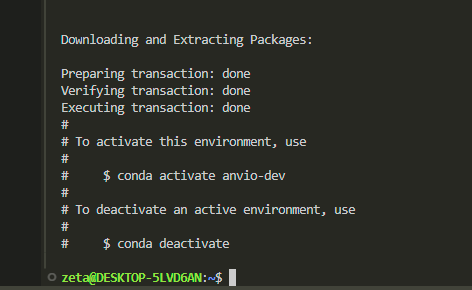
bash Miniconda3-latest-Linux-x86_64.sh
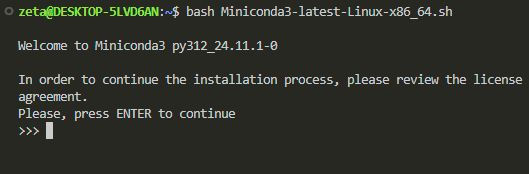
then it will be like installing something in windows, where you click “next” and “yes.”
at the end of the installation, you should see that it has been installed like this:
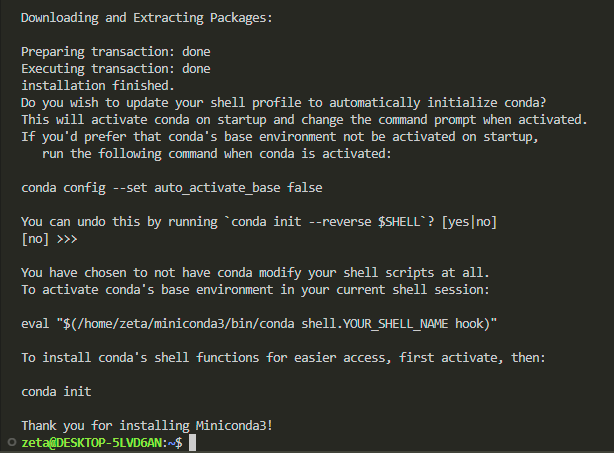
now you need to restart your terminal. close vs code and open it again.
verify:
conda --version
still not found. so i need to check if the file is on my linux or not:
ls

yes, there is a file for miniconda3. we can also see the inside of it (like browsing to your c folder) by saying “change directory”:
cd miniconda3/
and then list:
ls

okay, everything needed for it is installed. why doesn’t it recognize it?
it should be inside the bin file, and it is, but my system can’t access it:
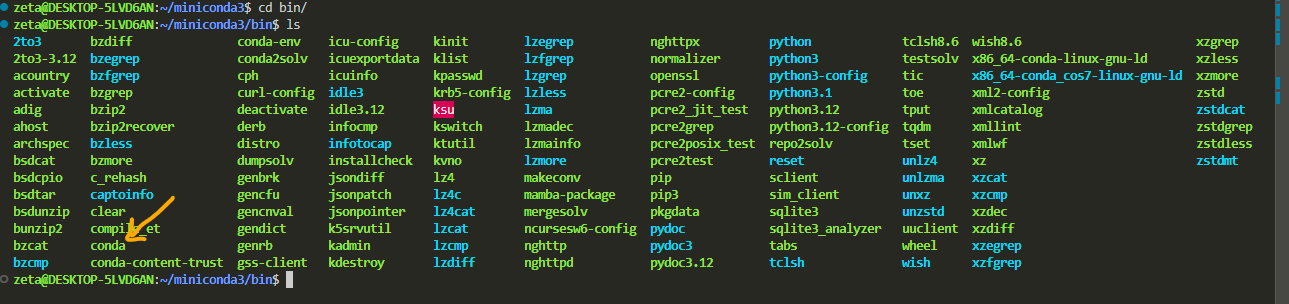
our system doesn’t have an eye to see things, so we need to give it access to files and specify in detail where to find them. this specification of where things are is called PATH in linux. it’s analogous to moving your mouse to drive D and selecting something, but here you don’t use a mouse—you type commands. you say, “okay, first open the file explorer, then go to folder D, then execute (like double-clicking) file X.”
you will likely encounter many errors during this course caused by PATH. so always check your path first. if you rule it out, then you can doubt other things.
- check your path (print working directory):
pwdthis will tell you where you are (which folder you are in now):
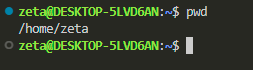
my system’s name is zeta, so it shows /home/zeta. yours will show the name you have chosen. this is called home in linux. it’s like opening the file explorer and being able to see all the folders (c, d, etc).
now check the path:
echo $PATH

things will only execute if they are accessible from the path, and i can’t see /home/zeta/miniconda3/bin, so we need to add it to the path, according to chatgpt. (you might encounter this error, or you might not. i’m trying to show how you can solve problems you face at any step, they’re pretty much the same. you check the path or the version and always consult chatgpt. you’ll be able to solve the problem.)
Let’s add miniconda bin to the path:
nano ~/.bashrc
when you run this, a new page will open with many things written in it. use your down arrow to scroll to the end of the text and paste this line AFTER adjusting your own username instead of zeta:
export PATH="/home/zeta/miniconda3/bin:$PATH"
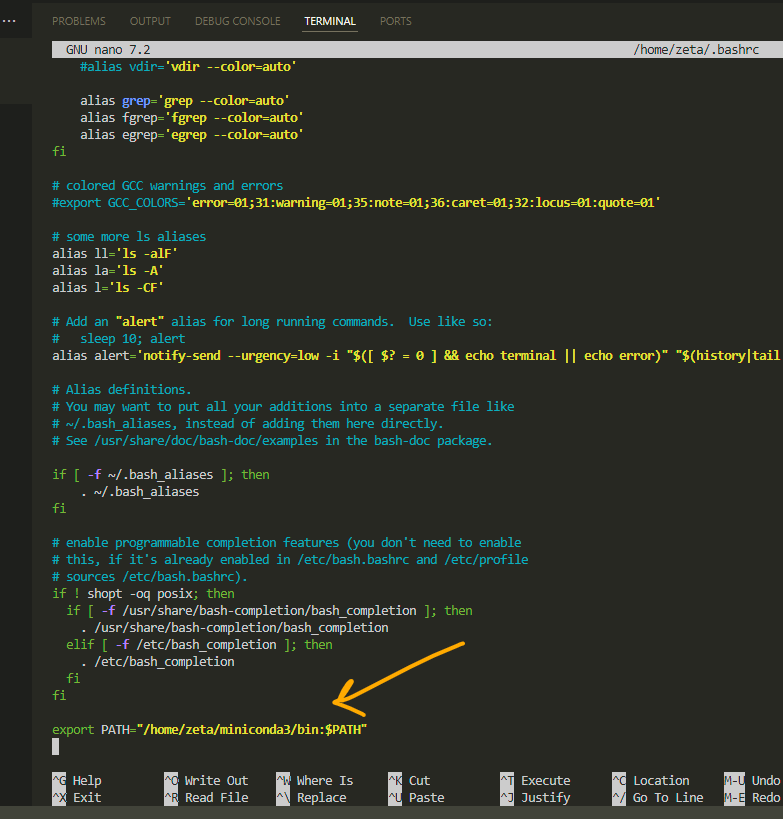
do you see ^O at the bottom of the page? ^ means ctrl here. press ctrl and o, then it will ask if you want to save it with the same name—we want that, so press enter. after that, press ctrl and x to exit (it says at the bottom of the page that it is for exit).
then run:
source ~/.bashrc
and check to see if conda is now accessible by your computer:
conda --version
voila! we solved a problem. this is where i go for a cup of tea.
this troubleshooting took me more than an hour. the time you spend now will save you later. spend as much time as it takes—each time it gets easier, and problems get solved by applying previous solutions.
i assume this is the very first time you are installing anvio, so i will skip the recommendation on the anvio install page that says you should make sure you are not in any environment or don’t have an environment named
anvio-dev. if this is your second, third, fourth, or fifth time :D, then please take care of those steps before proceeding.
3. create a place only for Anvio
anvio works with many different software and programs, and these programs have different versions. we need to make sure they are compatible and can interact with each other properly. to achieve this, we create something like a folder (called an environment) specifically for anvio, where we specify what version of each software to install. this way, if something doesn’t work, we know which version caused the issue and only change that specific version instead of everything.
for example, the latest version of python at the moment of writing this is 3.12, but we want to work with version 3.10. we can specify this in our anvio environment.
so, please copy paste this in your terminal:
conda create -y --name anvio-dev python=3.10
we created it, and now we need to enter this environment to build things:
conda activate anvio-dev
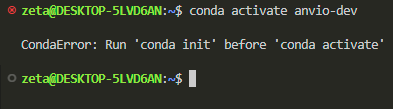
it says you have created it but haven’t initialized it yet, so we do that:
conda init
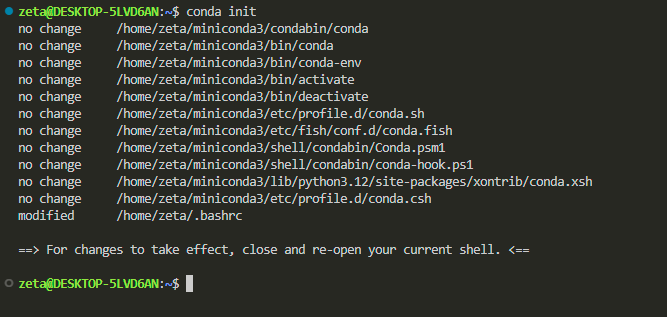
it also tells me to close and re-open my terminal. (remember, we need to follow every instruction we see to do things right.)
when i re-open, i realize it says (base), which wasn’t there before. this suggests that we now have more than one environment, and my terminal is indicating that i am not in the default environment or my anvio environment.
how do i go inside my anvio environment? i ask conda to activate that environment for me:
conda activate anvio-dev

okay, now we have a clean and fresh environment waiting to be occupied.
4. install many software all at once
in the anvio page, we see a paragraph containing six lines of code separated by \ from each other, which can be executed all at once.
it will probably work if you just copy and paste it. but, as a beginner, i prefer to execute each line individually, troubleshoot if necessary, and then move on to the next line. so let’s do that here.
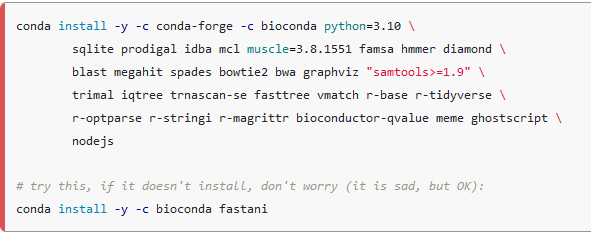
copy each code, wait for it to run, then move on to the next:
conda install -y -c conda-forge -c bioconda python=3.10
conda install -y -c conda-forge -c bioconda sqlite prodigal idba mcl muscle=3.8.1551 famsa hmmer diamond
conda install -y -c conda-forge -c bioconda blast megahit spades bowtie2 bwa graphviz "samtools>=1.9"
conda install -y -c conda-forge -c bioconda trimal iqtree trnascan-se fasttree vmatch r-base r-tidyverse
conda install -y -c conda-forge -c bioconda r-optparse r-stringi r-magrittr bioconductor-qvalue meme ghostscript
conda install -y -c conda-forge -c bioconda nodejs
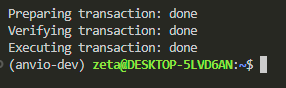
all of them ran smoothly for me. you should wait until you see something like this after running each line.
also, if you forgot which line you entered, press the up arrow on your keyboard, and the latest command will appear.
5. install anvio itself
now we have everything that anvio needs to be installed.
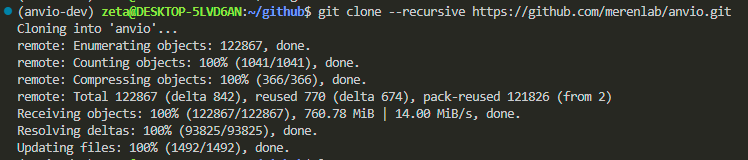
let’s make a directory (a folder) inside our anvio environment to download the files from a website called github, where the anvio code has been shared, into this folder.
mkdir -p ~/github && cd ~/github/

this command has created a folder named github and opened it. the blue text indicates that we are inside this directory.
now we can copy (clone) anvio’s code to our directory by running this:
git clone --recursive https://github.com/merenlab/anvio.git
next we move inside the anvio directory:

and run this code to install somethings that our python needs to be working properly:
pip install -r requirements.txt
everything ran smoothly, except for some errors I encountered:
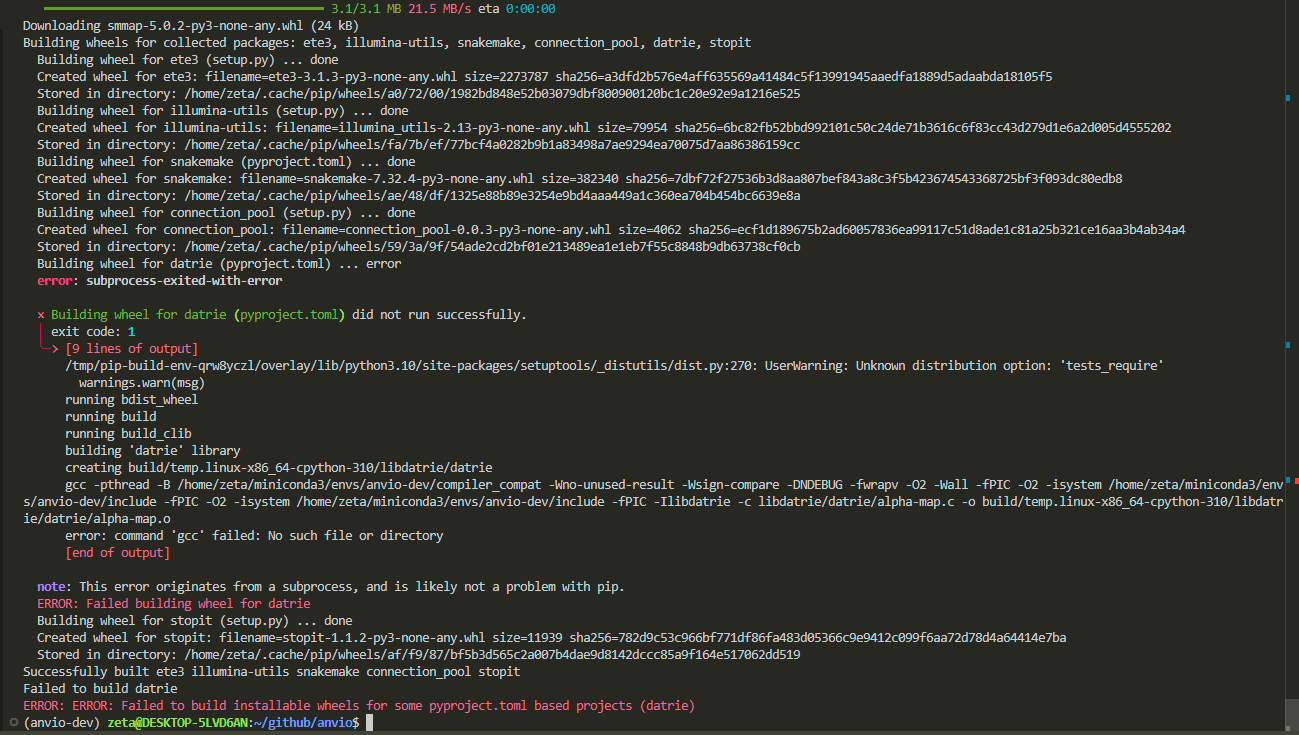
let’s update our wsl to see if it fixes it:
(remember that when you type your password in wsl, nothing will appear, but it is being typed. don’t feel confused.)
sudo apt update
sudo apt full-upgrade
sudo apt install gcc
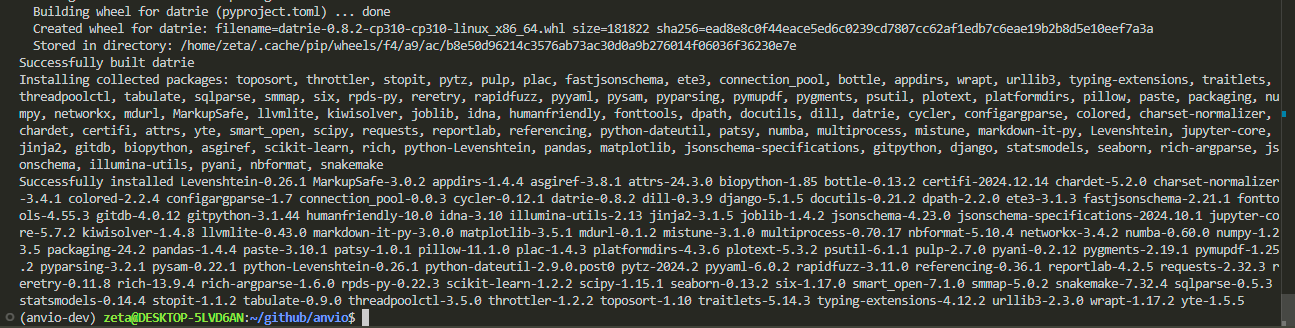
we run the code again to see if the problem is solved:
pip install -r requirements.txt
no errors this time, and we now have a nice and complete version of anvio on our system.
this code, which looks like absolute gibber gabber, will help conda connect to anvio and get the latest update. lines that start with # are called comments, and you don’t need to enter them in the terminal, they are for humans to read and understand what the code is doing.
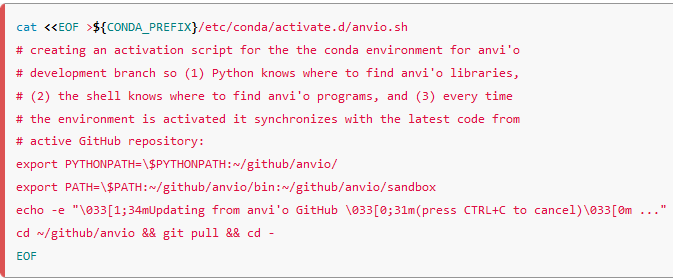
cat <<EOF >${CONDA_PREFIX}/etc/conda/activate.d/anvio.sh
export PYTHONPATH=\$PYTHONPATH:~/github/anvio/
export PATH=\$PATH:~/github/anvio/bin:~/github/anvio/sandbox
echo -e "\033[1;34mUpdating from anvi'o GitHub \033[0;31m(press CTRL+C to cancel)\033[0m ..."
cd ~/github/anvio && git pull && cd -
EOF
it won’t produce results. it will just run silently.

we are in anvio environment, but we ask conda to activate it once again to update it and make the link complete:
conda activate anvio-dev

then ask anvio to test itself:
which anvi-self-test

display anvio’s version:
anvi-self-test -v
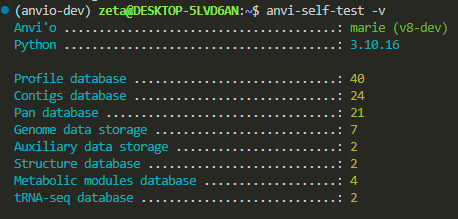
anvio installation is complete :)
please remember that every time you close VS Code, you exit the anvio environment (and go back to the base environment). so, we always need to ask conda to activate the anvio environment for us by saying conda activate anvio-dev, then continue with building things.